 My husband teases me because I have at least five different methods and tools to make gourmet coffee at home. You don’t have to be rich to try out these delicious ways to brew good coffee. Each one is a taste adventure of its own. These are various methods for preparing delicious coffee – we’ll go into specific beans, roasts or recipes (like Butterbeer Latte), in another post. So we begin our coffee world tour to learn different types of coffee – off to beautiful Paris! (Say it with a French accent: pear-REE.)
French Press
Our first stop on the coffee world tour is France. A French Press is inexpensive and one of the simplest ways to make a delicious, rich brew. You can control how strong it is by the beans you choose, how much you put in, and how long you let it steep.
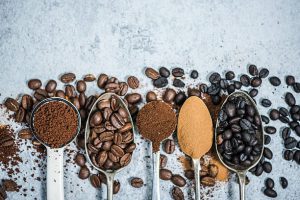
First of all, for the absolute best and freshest coffee taste (in all preparation methods), buy whole beans and grind them right before using. When in a hurry, however, you can use pre-ground from the store or grind a bunch once a week and store in a jar in a cool, dark cupboard.
For the French Press, measure in 1 regular spoonful (or coffee scoop) per cup for a nice, strong, coffee. Measure half if this comes out too strong – you will want to experiment to your own perfect taste. Same goes for which coffee beans you use (brand, origin, etc.) For a gourmet touch, you can add a teaspoon of your favorite spice to the grounds in the press – cinnamon, cardamom, allspice, ginger and fennel are some of my favorites (use one at a time).
Get hot water boiling in your teapot. I usually make a full French Press pot at a time. But you can fill it only halfway, too, depending on how many cups you want to drink today. I pour about 1 cup of boiling water per cup of coffee I want (for American-size 8oz cups of coffee).
Pour the boiling water over the grounds inside your French Press. Place the lid on top, but do not push the handle down yet. Cover the whole thing with a thick towel or tea cozy to keep it hot, and let it steep for between 3-5 minutes – again, experiment to see which you like the best.
When your timer is up, slowly and carefully push the handle all the way down to force the coffee grinds to the bottom of the press (this is the “press” part). Now you can pour it into your favorite mug and add any cream or sugar you’d like. You can also pour it all into an insulated coffee carafe or thermos to keep the whole pot hot.
Simply rinse out the French Press when done. Occasionally I’ll remove the glass part from the metal casing and run it, along with the metal lid and press, in the dishwasher. You can compost the grinds, too, from all these different types of coffee preparations.
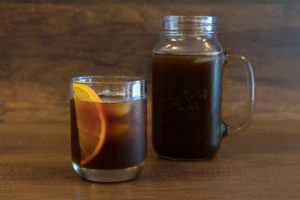
Kyoto Cold Brew
Now we’ll fly to Kyoto, Japan where coffee was cold brewed as early as the 1600s – the first known place where this method was used. Sometimes called Kyoto-style coffee, this is the simplest method for brewing coffee, but takes the longest. However, you don’t need electricity, so learn this one in case the zombie apocalypse comes someday.
For this method you only need a large gallon or half-gallon jar. Use 1/3 cup medium-coarse grind coffee per 1-1/2 cups of water. I use a large jar so this lasts me a while, but you can use a smaller jar and make enough for a couple of cups next morning.
Do this preparation before you go to bed. Put your grinds (and any fun spice you want) with the water into the jar. Seal it and let it sit either on the counter or in the fridge overnight.
Another benefit to cold brew coffee is that the acid of the beans is reduced by 67%, per a scientific study by Toddy. So it’s easier on digestion and teeth, even though it’s deliciously strong and smooth. This would be a great one to take camping, too.
Next morning simply strain with a fine sieve, a cheesecloth or coffee filter in a strainer and drink your coffee cold. Or strain and heat it up in a pot or microwave, if you want it hot. Once strained, you can keep it in the jar in the fridge all week.
On to our next country in exploring different types of coffee:
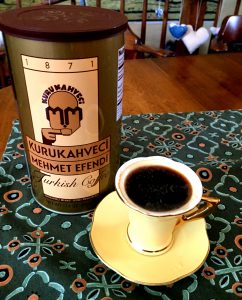
Turkish Coffee
Now we’ll fly to Turkey, waving to Greece on the way for this method found in both countries. The first coffee house opened in Turkey in the 1500s and this is the method they used. Traditionally they have a wok-type pan filled with sand. In alchemy this is called a Sand Bath. The fire under the pot heats the sand, which keeps a very hot, even temperature.
The barista pours the coffee grounds, a little sugar and the water into a tiny, copper ibrik. With Turkish coffee a pinch of ground cardamom is specifically added to the grounds as well – it helps to reduce the acidity and gives it an amazing flavor.
Like most countries on the Euro-Asian continent, coffee is drunk very strong in tiny espresso cups. Ibriks come in all sizes; I have a tiny one for a single shot of espresso. Most of the time I like a big, American cup, so I also bought the biggest ibrik I could find. It fills my 8oz mug beautifully (listed as a 5-cup ibrik). In Greece this little copper cauldron is called a cezve.
With the sand very hot, the barista nestles the ibrik into the sand, moving it around here and there so that the coffee heats evenly. They do this for about 5 minutes until the coffee starts boiling, naturally melting and mixing the sugar in with the coffee like magic. They lift the ibrik up out of the sand at just the right moment before it boils over, then they shift it back in and bring it to a boil again, once or twice.
The ibrik has a pour spout and the coffee, grounds and all, are poured into your favorite mug. It’s just been boiling so you can add a little cream or milk if you would like, but traditionally this is drunk black. It is so good you don’t need cream. Let it sit a minute in your mug while the grounds settle to the bottom and it cools enough to drink.
With this most amazing cup of coffee you cannot drink all the way to the bottom – stop right before you start sipping up grounds.
When I first discovered Turkish coffee and shared the method with my father-in-law, he exclaimed, “Oh, that’s Cowboy Coffee! They would boil it in a pot on the range.” Yes, pioneers and cowboys would boil coffee in a pot with water and probably sugar, but they didn’t add the cardamom or use an ibrik, so there.
Italian Brewed Espresso
Now off to Italy! When I first looked for a coffee maker to take camping, I discovered this sweet little gem. It is claimed to be used in every household in Italy – it is Italian-made, after all. It’s the Bialetti stovetop espresso maker, sometimes called Bioletti Moka Espresso Maker.
You can use this when camping or at home on your stovetop. Again, I got the largest one I could find, advertised as a 6-cup bialetti, but for me it makes exactly two American-size cups of delicious coffee (I sometimes like to put lots of cream and sweetener with my espresso shots).
You can use any kinds of beans with this, it doesn’t have to be espresso. This is a simple stovetop brewer that specializes in espresso-style coffee. Since it’s on the stovetop it may take 3-5 minutes, like the Turkish coffee. It’s as simple as unscrewing the top part, remove the filter piece, fill the bottom part with water to the fill line, scoop your coffee into the filter basket, nestle it in place in the bottom part. Then you screw the top back on and let it heat on the stovetop. It will boil and brew into the top part of the moka pot. You will hear it bubbling, and when the top part is full, the coffee is done.
This is a delicious coffee which I don’t find quite as strong a brew, but again, it depends on which beans you use and how much you scoop in (I use one scoop/spoonful per cup of coffee I want). But you will find this coffee, even with espresso beans, to be less strong than an espresso made with an actual espresso maker with 15 pounds of pressure.
Espresso, Cappuccino & Latte
So while we’re in Italy we’ll consider the most expensive option for delicious espressos and cappuccinos – it’s with a real espresso maker machine. These come in all price ranges, for both commercial and home use, as well as various sizes. I’ve done a lot of research into these and have tried three different ones. Delonghi is a brand you can trust, although mine didn’t last as long as it should have – I discovered too late that if you tamp too hard, over time it ruins the machine. When I got my new machine in December, 2017, I chose Mr. Coffee Cafe Barista Espresso and Cappuccino maker for $200. You can get a decent espresso maker for around $100-$200. Fancier ones go from $500 up to $1,000 or more.
These machines are made to pull espresso shots – they have 15 pounds of pressure and do a great job at making real espressos. They offer a one-shot or two-shot grind basket. This is strong coffee, real espresso. The one I have makes lattes as well as espressos and cappuccinos, and I especially like that it steams and froths whichever milk I want automatically.
Your machine will come with instructions, and once you learn to work an espresso machine, most of them work about the same. They are simple and easy. Just be sure to tamp lightly!
For an espresso, simply do one or two shots, which pour directly into your tiny espresso cup; add a tiny bit of sugar if needed. Be sure to use freshly-ground espresso beans for the best flavor – even pre-ground espresso beans are better than normal coffee beans.
For cappuccino’s, you have to froth and steam your milk to pour on top. The Delonghi brand has a wand you swing out, place inside your little pitcher or cup of milk, and when you turn the knob it heats and steams/froths your milk, which you then pour on top of your espresso shot. If your espresso maker does not have an attached steamer wand, you can buy milk frothers – one of the best is a small metal pitcher frother, but you have to heat up your milk before you pour it in and pump the frother. Even a hand-held electric frother does pretty well – it’s not the best, but it’s an inexpensive and portable option. Again, you have to heat up your milk first.
These methods work with any kind of milk, but you will find that certain milks froth up much better than others. Real cow’s milk froths the best, whereas some of the nut milks hardly froth at all. Coconut Creamer works well, and I’ve had good success with my homemade cashew nut milk.
Coffee Passport
This is just an introduction to different types of coffee preparations. On this site I will explore more in the world of coffee – different coffee roasts, origins, recipes, grinds, and more methods. Grab your coffee passport, your favorite mug and let’s journey together.


 We love our coffee and some of us love to drink lots of it. But too much, too strong or too caffeinated and it can mess up our digestion with too much acidity. Cultures around the world, though, have found preparation methods to make coffee less acidic. Plus they taste delicious, too.